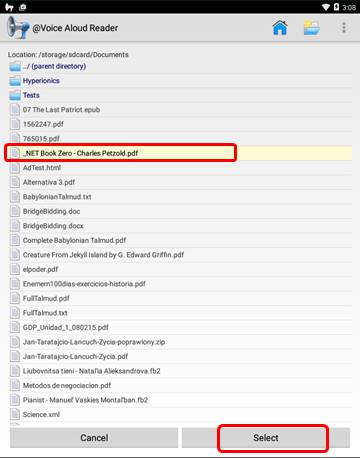
How to use @Voice PDF Crop Plugin
1.
in @Voice app, press “Open” icon on top (folder image) and find your PDF file,
press the file name, then press “Select” button:
2.
The following screen appears (if it does not appear, you may
have selected in the past "Don't show these options..." - you can restore it
under the Settings menu - "PDF text import setting".) Either use the “Try to remove…”
automatic options, that I outlined in green below, or use the “Manually crop pages…” that I
outlined red:

3.
If "Manually crop..." was selected, the @Voice PDF Crop Plugin screen appears as follows:
We want to remove the header (with book title and author name) and footer (with
Version 1.1 text and page numbers.
4.
Press the top edge and drag it down to gray-out the book title
and author’s name:
Any text that is in the grayed out area will not be included in @Voice text extraction.
5.
Do the same at the bottom to exclude the footer and page
numbers:
6.
You may do this for each page separately, but in most cases you
want the same crop for all pages (or sometimes all even numbered or
odd-numbered pages). So press the “hamburger menu” at top left and select
what’s needed from the options there, e.g. “Apply crop to pages: Current +
following”:

7.
You may now review the other pages to confirm that they have the
same crop applied, by pressing one of the round < or > buttons on top or
using the slider. When done, press the back button or “Finish” on the
“hamburger” menu. @Voice will extract text without the headers, footers and
page numbers.